


Vorbestellungen möglich
Verfügbarkeitsdatum: May 17, 2024
Weiterführende Links
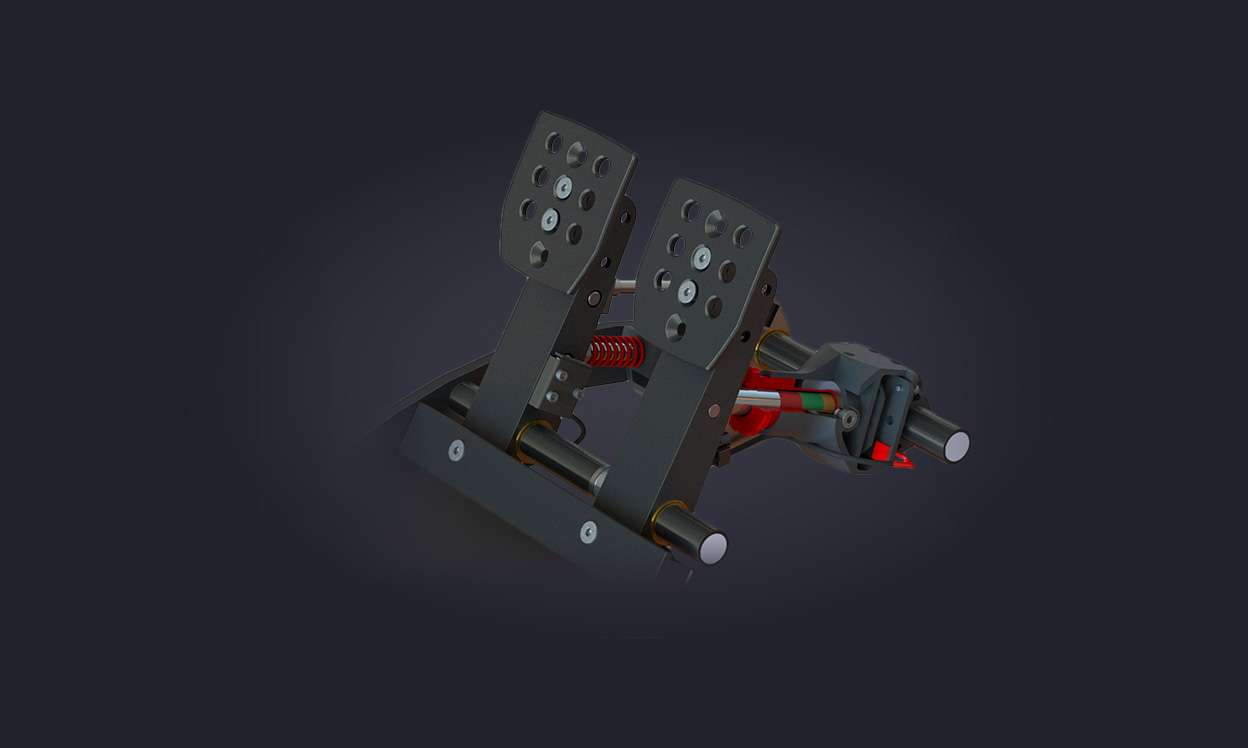
Features
- Kann mit dem Bremspedal der ClubSport Pedale V3 (invertiert) verwendet werden
- Vermittelt das Gefühl eines Bremsdruckpunktes wie im Rennwagen
- Einstellbar in Pedalweg und -widerstand durch Kombination der verschiedenen Härtegrade und Durchmesser der Elastomerfedern zusammen mit dem PU-Schaum
- sehr einfach zu schmieren und sehr haltbar, mit einem Lebenszyklus von weit über 1 Million Bremsvorgängen
- Elastomerfedern hergestellt aus dem high-end Material Eladur, „made in Germany“
- Es gibt viele mögliche Kombinationen der Elastomerfedern. Diese Vergleichstabelle soll Ihnen einen Eindruck von den Efffekten der unterschiedlichen Kombinationen vermitteln:
|
|
Ø13 |
Ø12 |
Ø13 |
Ø12 |
|
Ø13 |
very |
hard |
medium |
soft |
|
Ø12 |
hard |
medium |
soft |
|
|
Ø13 |
medium |
soft |
|
|
|
Ø12 |
soft |
|
|
|
Kompatibilität
Produkte
- ClubSport Pedale V3
- ClubSport Pedale V3 invertiert
Hinweise
- ClubSport Pedale V3 / ClubSport Pedale V3 Invertiert (nicht enthalten) sind zwingende Voraussetzung für die Nutzung des ClubSport Pedale V3 Brake Performance Kit.
- Die Vorspannschraube der ClubSport Pedale V3 / ClubSport Pedale V3 Invertiert kann mit dem ClubSport Pedale V3 Brake Performance Kit nicht mehr in vollem Umfang verwendet werden, sondern dient dann ausschließlich zum Eliminieren des mechanischen Spiels.
- Das ClubSport Pedale V3 Brake Performance Kit benötigt zur Installation eine Teilzerlegung der Pedale und setzt daher ein gewisses Maß an technischen Fertigkeiten voraus. Für mehr Informationen lesen Sie bitte die Kurzanleitung oder das Handbuch in der Download-Sektion.
Verpackungsinformationen
- Abmessungen (L x W x H) 20.5cm x 15.5cm x 3cm
- Gewicht 0.1kg
- Volumengewicht 0.19kg
Inhalt
- 2x Elastomerfeder rot Ø13 x 20 mm
- 1x Elastomerfeder rot Ø12 x 20 mm
- 2x Elastomerfeder grün Ø13 x 20 mm
- 1x Elastomerfeder grün Ø12 x 20 mm
- 1x Polyurethanfeder (PU Foam) Ø13,5 x 15 mm
- 1x Flasche Lithiumfett für die Elastomerfedern
- 1x Installationswerkzeug (Fix-1) (G)
- 1x Kurzanleitung
Follow these steps to potentially solve the problem:
- Open the Steam application
- Select "View"
- Select "Settings"
- Select "Controller"
- In "General Controller Settings", uncheck the checkbox for "Generic Gamepad Configuration Support".
If the issue persists, reinstall the Steam Client.
There are no differences in resolution of the pedals when connection to either one of the two connectivity types. In terms of functionality, connecting the pedals via RJ12 to the wheel base allows for the Brake Force (BRF) function in the Tuning Menu to be available.
Ensure that only one connection type is in use! Connecting the pedals via both RJ12 and USB at the same time can cause damage to the PCB of the pedal set.
La réponse à cette question est non. Les pédales ont la même résolution lorsqu'elles sont connectées à l'un des deux types de connectivité.
Veuillez noter de ne pas utiliser simultanément les connexions RJ12 vers la roue et USB vers PC. Cela peut causer des problèmes et même endommager le pédalier !
La respuesta a esta pregunta es no. Los pedales tienen la misma resolución cuando se conectan a cualquiera de los dos tipos de conectividad.
Tenga en cuenta que no debe utilizar el cable RJ12 a la base de volante, y el cable USB de conexión al PC al mismo tiempo. ¡Esto puede causar problemas e incluso hacer daño a su set de pedales!
La risposta a questa domanda è No.
I pedali hanno la stessa risoluzione quando sono collegati a uno dei due tipi di connettività. Si prega di notare di non utilizzare entrambe le connessioni RJ12 alla base del volante e USB al PC contemporaneamente. Ciò può causare problemi e persino danneggiare il set dei pedali!
Die Signalauflösung der einzelnen Pedalachsen ist bei beiden Verbindungsarten gleichbleibend. Jedoch kann die Brake Force (BRF) Funktion nur direkt über das Tuning Menü angesteuert werden, wenn die Pedaleinheit direkt an die Wheel Base angeschlossen ist.
Sollten Sie die Pedaleinheit via USB-Anschluss betreiben, so kann die Funktion BRF nur mittels dem FANATEC Control Panel oder über FanaLab angesteuert bzw. Geändert werden.
Bitte beachten Sie, dass Sie niemals gleichzeitig die RJ12 Verbindung zur Wheel Base und die USB-Verbindung zum PC nutzen. Dies kann zu Problemen und sogar Beschädigungen an der Pedalerie führen!
- Use a high quality hex/Allen key, ideally a driver type or T-shape (rather than L-shape) as this can help with hammering and leverage.
- Use the 'square' end of the hex/Allen tool, not the ball end.
- Adding some heat to the set screw (using a heat gun or hairdryer) can help to soften the thread-locking glue.
- A couple of taps with a hammer on the inserted hex/Allen tool can help to fully seat the wrench before attempting to turn the screw, plus this type of impact also helps to loosen the screw.
- If the set screw doesn't move, and you feel the tool rotate through one 'corner' of the socket, stop immediately to avoid further damaging the screw. We recommend contacting support. It may still be possible to remove the screw by using a Torx bit.
- If screw is completely damaged, the main bolt connecting the pedal arm to the brake assembly will need to be hammered out. This process can damage the bolt as well as the end of the brake assembly, and the parts will need to be replaced. We recommend that you send in your pedals for this process to be completed by a repair technician.